Depending on which world you come from, a split screen could mean two very different things. For gamers, it’s an opportunity to play with friends while sitting on the same couch.
But for the world of movies, it’s about splitting your image to create different types of focus or shifting the timing of each side to create a better performance.
Let’s break down the two different ways you can use split screens for your next project
Keeping Things In Focus
While not the focus (pun intended) of this article, you can use the concept of split screen to split your focus and capture a subject in the foreground while also keeping an additional subject in the background in focus. This technique has been used in loads of movies and creates an interesting visual image that elevates tension in a scene.
To get this type of “split screen,” creatives need to use a special tool called a split diopter, which is a filter that goes on the front of your primary lens. Here’s a great video showcasing how split diopters were used in JAWS and what those shots would look like without them.
This filter magnifies half of your image so you can have two different distinct areas of focus. While not the perfect tool for every shot, it offers a unique way to frame two characters (or objects) that are standing very far apart.
Splitting Your Image
The traditional split screen technique is all handled in the editing room. This is where your editor doubles up the image in the timeline and crops the top image layer to “split” it with the underlying image. Director George Lucas used this technique when editing the prequel trilogy. If you happen to own a DVD copy of
Episode 1, you can find a bit about it in the behind-the-scenes extras.
This technique works best when you have static shots where your framing doesn’t change. Using this approach, you can have one actor play two characters at once, or even shift the timing of the performance to give the scene a bit of extra gravitas. Creatives can push the technique further and even use moments from different takes and splice them together.
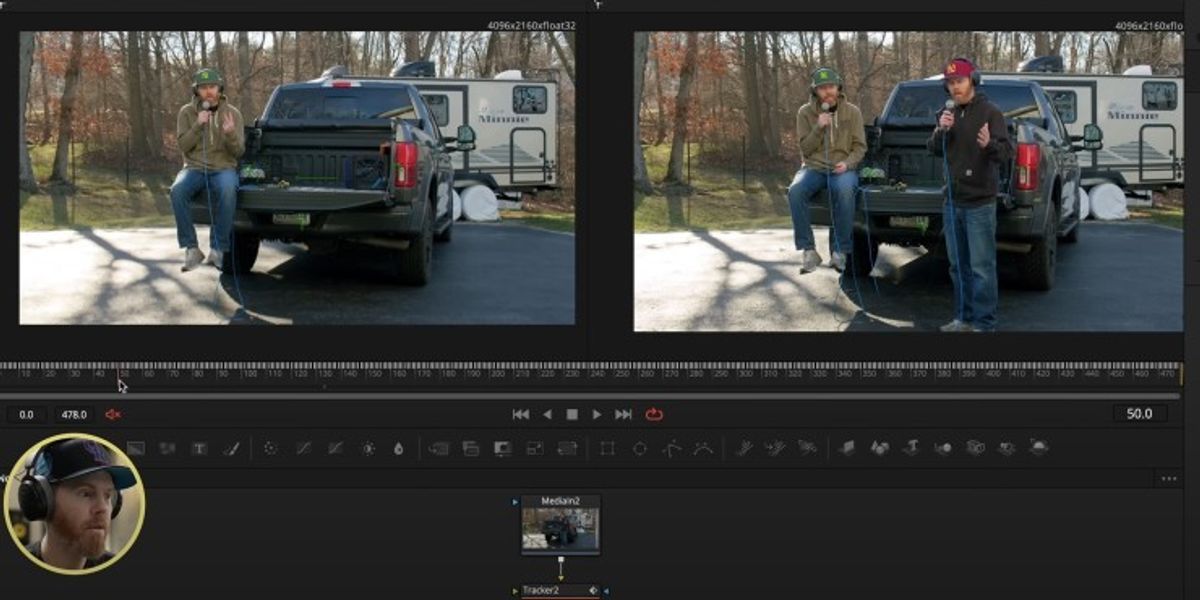
But what if all your footage is handled? This is where we dive into the world of VFX to steal some techniques, specifically compositing and camera tracking.
The YouTube Channel Creative Video Tips did a really great breakdown of the technique using
DaVinci Resolve and Fusion in only four steps:
- Stabilize your footage
- Mask, line up your shots, and merge
- De-stabilize
- Crop and reframe
It’s that easy. Kind of. This approach will only work if your handheld footage isn’t all over the place. However, I’ve seen this technique used with retiming to great effect on some shaky footage. Give the video a watch to get the nuts and bolts of each step:
The thing to keep in mind when using this editing technique on different takes is to make sure you have similar framing. This will help you line up everything in Fusion. But even if you’re off by a little, you can still get away with using this approach if it’s on screen for a short time.
Fine-tuning your masked edges will be the key to selling this effect.
Or you can plan for using a split screen in post and lock off your shots on a tripod. Then you can add handheld shake in post to match the footage you already shot. One last thing to note, while the above technique is shown using Resolve, creatives can definitely use other programs like Adobe Premiere Pro and
After Effects.
But what do you think? Is this a technique you’d want to use on your next project? Let us know in the comments!
Related Articles Around the Web