For years, Lumetri defined what color inside Adobe Premiere felt like. It was immediate, accessible, and—most importantly—fit for its intended purpose. You could drop it onto a clip, make a few adjustments, and arrive at an image that held together well enough to move the project forward. For many filmmakers, that was the point. Color was part of the finishing process, not a separate discipline.
That model worked because of what filmmaking demanded at the time: speed in editorial, with color finishing happening later. But that assumption has shifted. Color is now part of authorship earlier in the process, and the editorial system must support that—not just get you to “good enough,” but carry your intent forward.
That is where Color Mode in Premiere (beta) comes in.
Lumetri was never intended to be a full color grading environment; it was built for editorial—prioritizing speed and direct control. Color Mode extends that foundation by treating color as part of the pipeline rather than an effect layered on top, and it challenges the assumption that serious grading requires leaving the edit for a separate, dedicated tool.
How Color Fits in the Filmmaking Pipeline
In a traditional filmmaking pipeline, color does not exist in isolation. It is part of a larger system that includes acquisition, editorial, and eventually, turnover to finishing or color.
Filmmakers are already familiar with this concept through turnovers. When a project moves from editorial into color, what matters is not just how the image looks but how reliably that look can be translated, rebuilt, and refined in another system. Traditionally, a turnover is about translating your edit into something another system can understand. You flatten decisions, export metadata, relink media—reconstructing the timeline elsewhere so color can happen. That introduces friction: context is reduced, work is duplicated, and any change means repeating part of the process.
Color Mode shifts that dynamic by keeping color within the editorial structure itself. Instead of exporting a version of the timeline, you continue working on the same timeline. Operations become the organizing principle—per clip, per group, or across the sequence—so changes propagate intentionally. A sequence-level adjustment updates everywhere. A grouped scene can be refined once without reapplying grades over and over again on multiple clips.
The implication is procedural, not just visual. Instead of treating color as something that needs to be reconstructed after editorial, you are developing the results you want directly on the timeline in Premiere. Adjustments made at the sequence or group level remain intact as the project evolves, rather than needing to be reinterpreted downstream. Turnovers still exist when required, but they are no longer the point where color work effectively begins—they become a continuation of decisions that are already structurally defined.
Lumetri was never intended to carry that entire burden. It was a tool for shaping an image inside editorial—not a system designed to define or preserve a color pipeline across stages. As long as color decisions remained relatively contained, the approach worked. But as filmmakers began doing more inside the edit—working with log footage, building looks earlier and pushing images further—the boundaries of that approach became more visible. Color Mode exists to remove that boundary: to let color decisions live within the timeline itself so they can be developed, refined, and carried forward without being translated or rebuilt later.
The Lumetri vs Color Mode Workflow
At its core, Lumetri treats color as a sequence of operations. Each adjustment builds on the one before it. This makes it intuitive: you move step by step, shaping the image as you go. That model aligns well with editorial thinking. You make a decision, see the result, and move forward. But it also means that earlier decisions influence everything that follows. As adjustments accumulate, the relationship between controls and results becomes less direct. Filmmakers often compensate for these challenges through experience—developing a sense of order, restraint, and correction. But that experience is managing the system rather than being supported by it.
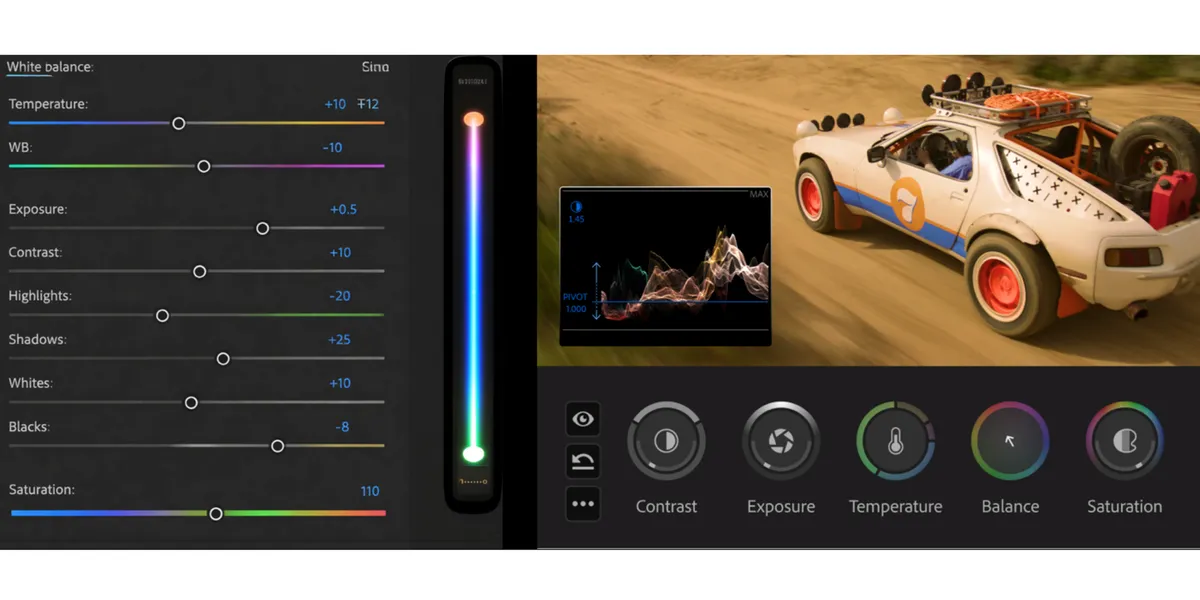
With Color Mode in Premiere (beta), we still preserve that immediacy—but have relocated it. In Edit mode, the Properties panel provides fast color controls that map directly to the first Adjust operation in your Color Mode grade. You can make quick, per-clip fixes without leaving the timeline, while those changes remain part of the broader Color Mode structure. The result is the same speed for individual shots, but now anchored in a system that can scale across groups and sequences.
Color Mode approaches the problem from the perspective of a color pipeline, not an effect stack. Rather than organizing color as a sequence of steps, Color Mode treats it as a system. The question shifts from “what adjustment comes next?” to “how should the image behave as a whole?”
This shift also changes how you work. Color Mode encourages exploration in a way Lumetri never fully supported. Instead of carefully building and protecting a look step by step, you can push the image earlier—experimenting with contrast, color, and tone without worrying that each move will break what came before it. That freedom allows you to make creative decisions sooner, defining what the image should look like while you’re still shaping the edit, rather than deferring those choices to a later stage.
In practice, Color Mode behaves more like an application within the application—a dedicated environment inside Premiere for shaping color with its own internal logic, rather than a panel layered onto the timeline. This approach aligns more closely with how color is handled in finishing systems. Instead of building a look step by step, you are working within a structure that is designed to maintain coherence as the image evolves.
The design of Color Mode was led by Alexis Van Hurkman—a former colorist and longtime trainer who has helped shape professional grading workflows across film, broadcast, and streaming throughout the years. He authored The Color Correction Handbook: Professional Techniques for Video and Cinema, a de facto training text for colorists, used by practitioners entering the field. His work spans SDR and HDR pipelines, color management, and on-set through finishing practices. Alexis’s goal was not to make Lumetri more capable but to build a system that behaves like a dedicated color environment and aligns with how color is handled in professional finishing—while keeping it within the editorial environment to simplify the changeover process.
What emerges is a unified color pipeline. Adjustments exist within a defined color space and are evaluated in relation to one another. The image is not repeatedly rewritten at each step; it is interpreted through a consistent framework.
For filmmakers, this has a practical implication: the image holds together more reliably as you push it. Early choices are not fixed; they can be refined.
Using Lumetri and Color Mode
Color Mode now sits where Lumetri used to be—not as an added feature, but as the primary place where color happens. Lumetri itself hasn’t disappeared. It’s still there, and projects built with it continue to work exactly as expected. If you’re in the middle of something, nothing breaks.
What changes is how you approach new work.
Lumetri and Color Mode aren’t just two sets of tools—they’re built on different ideas about how color should behave. Lumetri works step by step. Color Mode works as a system. When you combine them, you’re effectively layering two different models on top of each other, which can make the image harder to reason about as you push it.
That’s why, for new projects, it’s generally cleaner to pick one approach and stay within it.
You’ll still find places for quick adjustments. In Edit mode, the Properties panel now includes simple color controls for quick, per-clip fixes. Those are meant to keep you moving without pulling you out of the edit. When you need to go further—shape the look, refine across shots, or develop something more intentional—that’s where Color Mode takes over.
Some things you may be used to have shifted. Comparison Mode, for example, now lives in the Color workspace rather than Edit. The tools are still there—they’re just organized around this new way of working.
If you’re already deep into a Lumetri-based project, the practical move is to finish it where you started. The transition to Color Mode is most effective when it begins at the start of a project, not halfway through. Lumetri still does what it was built to do: move quickly, stay inside the edit, and get you to a solid image without friction.
What This Means Going Forward
For filmmakers, the shift is not about abandoning Lumetri. It is about placing it correctly—and using a system that can carry the image beyond it.
Color Mode changes where the work actually happens. You can define the look earlier, push it further without managing side effects, and keep refining without rebuilding. Decisions are not staged and protected—they evolve. And when the project moves forward, that intent moves with it.
Lumetri still serves immediacy inside the edit. Color Mode is where the image is defined, developed, and sustained. That distinction is the transition.
For more information on Color Mode in Premiere (beta), visit Adobe’s website for more information and download the beta through the Creative Cloud application.
Premiere Color Mode Article Series
This article is article number two in a series of articles on Color Mode in Premiere. If you missed the first article, check out Why Adobe Built Color Mode In the next article, we’ll shift to Color Management First—setting up your pipeline for success before you begin grading, and why those decisions shape everything that follows