
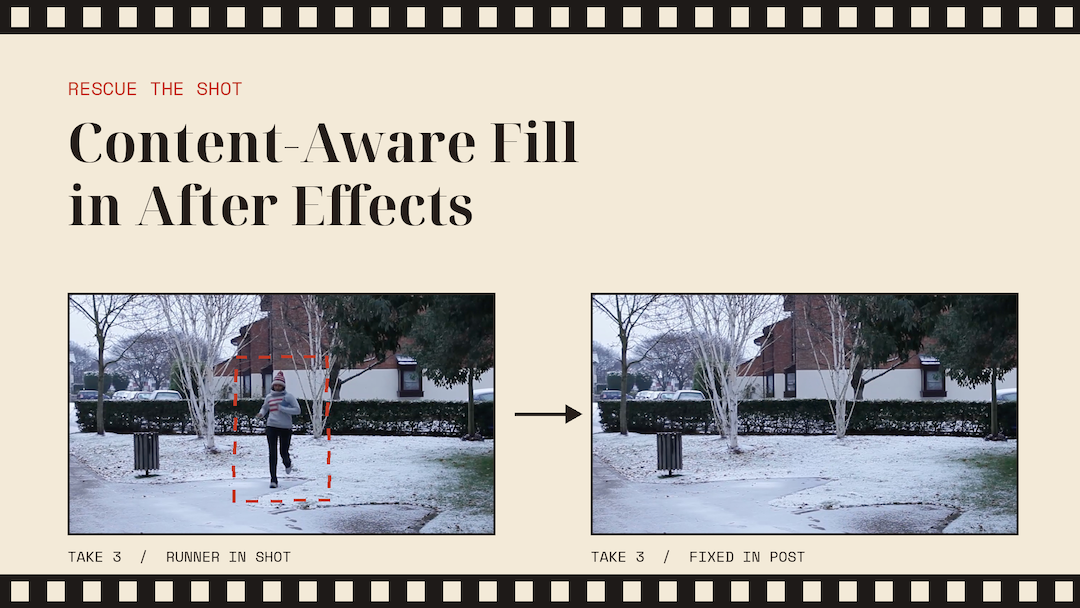
Every low-budget shoot has one. The take where the performance is perfect and the boom dips into the top of frame for two seconds. A runner who wanders across the back of the wide. A brand on someone’s T-shirt that you can’t get permission for. Going back isn’t an option, so the shot either stays as it is or gets fixed in post.
After Effects has handled a lot of this since Content-Aware Fill arrived in 2019. It looks at the frames around the problem and paints in what should be behind it. This is the routine we teach on our courses.
Look at what’s behind the problem
Content-Aware Fill fills a hole by borrowing pixels from the rest of the frame and from the frames before and after. If the camera or the object moves, the background is revealed at some point and there’s real picture to borrow. If the camera is locked off and a crew member stands still in front of a detailed bookshelf for the whole take, there’s nothing to borrow, and After Effects has to make it up.
Plain backgrounds fill well: sky, painted walls, grass, tarmac. Faces, text, fine patterns and anything the object casts a shadow on are much harder. A boom against a grey sky is usually easy. A crew member who walks in front of your actor is the hardest.
Give the shot its own comp
Drag the clip onto the New Composition button at the bottom of the Project panel, so the comp matches the footage’s size and frame rate. If you’re cutting in Premiere, right-click the clip in the timeline and choose Replace With After Effects Composition, and the fixed shot comes straight back into your edit.
Set the work area to cover the frames where the problem is visible, plus a second or so either side.
Cut a hole
Content-Aware Fill doesn’t work from a selection. It fills transparent pixels, and the simplest way to make them is a mask. Select the footage layer, draw around the object with the Pen tool or the Ellipse tool, then set the mask mode to Subtract so it becomes a hole.
Be generous. Include the shadow, any motion blur and the soft edge around the object, because a tight mask tends to leave a faint ghost outline. The Alpha Expansion setting in the panel grows the hole further, and the fill often works better when it includes a few pixels outside the object.


Make the mask follow the problem
If the camera or the object moves, the mask has to move with it. Select the mask in the Timeline panel and choose Track Mask. Position, Scale & Rotation is a good place to start, and Perspective suits a logo on a flat surface that turns towards or away from the camera. Track both ways, then step through and fix any drift by hand.

A boom bobbing over a plain sky often only needs one big mask. A person crossing the frame is where the AI tools earn their keep. Since version 26.2, After Effects has had the Object Matte Tool. Double-click the footage to open it in the Layer panel, then click the person, or draw a lasso or marquee round them. Fix broad mistakes with the Quick Selection Tool (formerly Roto Brush) and fine edges with the Selection Brush Tool. Press Spacebar to carry the matte across the frames, tweak anything it misses, then click Freeze to lock it and use it to cut the hole.


Choose a fill method
Open Window > Content-Aware Fill. The Fill Target preview outlines the transparent area in pink. Then pick a Fill Method:
- Object is for things that move across the background, such as a person or a car.
- Surface is for something stuck to a flat, still surface, like a logo on a wall.
- Edge Blend blends the pixels around the edge of the hole. It’s the fastest, and it suits plain surfaces like a boom against a clear sky.

On a plain background I’d try Edge Blend first. If it smears, move up to Surface or Object. If the light changes during the shot, turn on Lighting Correction, start at Strong. Set Range to Work Area.

Save the project, then click Generate Fill Layer. After Effects renders the fill to disk as an image sequence and adds it as a new layer above your footage.
Use a reference frame when it smudges
On a detailed background the fill can come out soft or blotchy, or the texture can crawl. Go to a frame where the hole sits in a typical position and click Create Reference Frame. After Effects opens that frame in Photoshop, where you clean it properly with the Clone Stamp or the Healing Brush. Save it, go back to After Effects and generate the fill again, and the clean pixels are carried through the shot. If the angle or the light changes a lot, add a second reference frame at that point.
A clean plate of the empty background, shot from the same position, can guide the fill in the same way.
Check it like an audience would
Play the shot back at full resolution and full speed, because some problems only show in motion. Look out for:
- a shadow left behind, the classic one being a boom shadow on a wall
- reflections of the object in windows, glasses or car paint
- an area that looks smoother than the rest of the frame
That last one is common, because the fill can lose the footage’s grain. Add Grain or Match Grain on the fill layer, masked to the fixed area, blends it back in. If only part of the fill is good, mask the fill layer down to that part.
Know when a reshoot is quicker
Some shots aren’t worth fixing in After Effects. It’s time to stop when:
- the object crosses the actor’s face or hands
- the object is in frame for the whole take and the background never shows
- the background is detailed and moves with a lot of parallax
- you’ve tried a few fills and a reference frame and can still see it on playback

Before you book a pickup, check the other options. Is there another take? Could you punch in and crop the problem out, especially if you shot 4K for an HD delivery? Would a cutaway cover the moment? And if you grade in DaVinci Resolve Studio, Magic Mask and the Object Removal effect on the Color page are worth a try too.
Wrapping up
Most of these rescues come down to the same few habits: look at the background first, cut a generous hole, pick the simplest fill method that works and watch the result at full speed. Let the AI tools do the fiddly selecting, but keep your own eyes on the result. And next time something you can’t move is in frame, grab five seconds of clean plate before you move the camera. Your future self in the edit will thank you.

Related